Preparation of installation image
Linux systems can be installed almost anywhere: on a desktop, laptop, USB drive, or even a phone (if the distribution supports it). The installation process is roughly the same, but some differences matter. For example, when installing Arch Linux as a second system, you may need to manually configure
efibootmgr. Dual boot setup also differs between BIOS and UEFI.- A USB flash drive
- The system ISO file
- A program to write the ISO image
- A machine where Arch will be installed
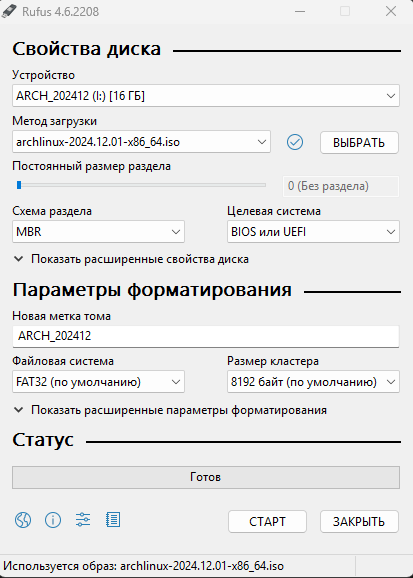
- Rufus
- Balena Etcher
- UltraISO
- Device: Select your USB flash drive.
- Boot selection: Choose Disk or ISO image and select the Arch Linux ISO path.
- Partition scheme: Select MBR.
- File system: Select FAT32.
- Cluster size: Leave as default.
All files on the USB drive will be erased.
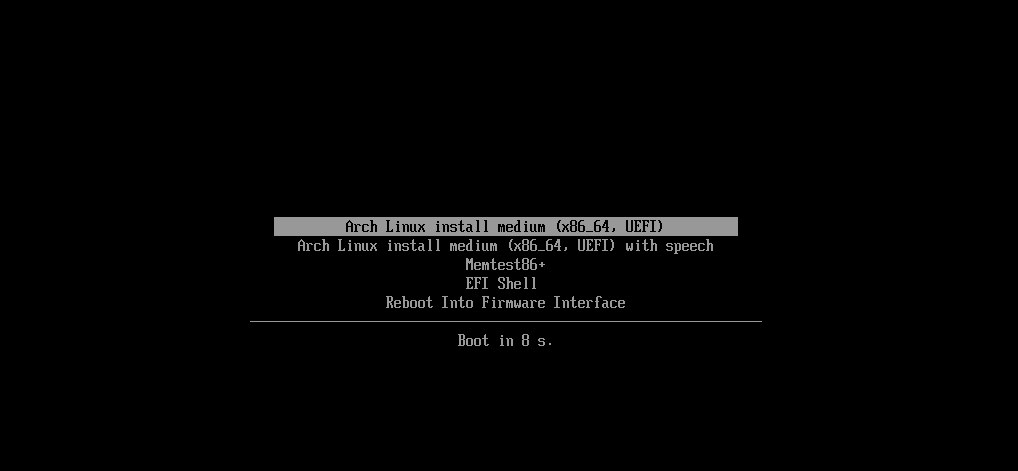
Installation
Setting up a wireless network
If you are connected via wired Ethernet, test connectivity:iwctl:

- List available wireless devices:
wlan0).
- Scan for networks:
- Show available networks:
- Connect to a network:
- Check status:
Disk partitioning
Two common partitioning utilities are:fdiskcfdisk
fdisk.
First, identify your disk.
Disconnect unnecessary disks to reduce risk of selecting the wrong disk.
| Partition | Size | Type |
|---|---|---|
boot | 1G | EFI system |
swap | 8G | Linux swap |
root | Remaining space | Linux filesystem |
p to list current partitions.
Press n to create a new partition. Keep default partition number and first sector, then set last sector to +1G for boot.
Repeat for swap (for example +4G to +8G) and use the remaining space for root.
SWAP is recommended if your machine has less than 8 GB of RAM.
w to write changes.
Archinstall
Now run:
en_US or ru_RU).
Press
? to search quickly.- Select
Manual Partitioning. - Select your disk (for example
nvme0n1). - For the 1G partition: assign mountpoint
/boot, mark for format, set filesystem tofat32. - For the root partition: assign mountpoint
/, mark for format, set filesystem toext4. - Select
Confirm and exit.
- Select
GRUB.
archlinux).
Root password
Set and confirm a root password.
User account
- Add username and password.
- Confirm superuser privileges (
sudo) withYes.
- Select
Type. - Select
Desktop. - Choose
KDE Plasma. - Choose
sddm.
All) unless you need a specific one.
Network configuration
- Choose
Use NetworkManager.
nano firefox btop
Timezone
Choose your timezone.
Press
? to search quickly.pipewire.
Install
- Select
Install. - Confirm
Yesand wait. - When asked to continue setup in
chroot, selectYes.
GRUB configuration
Check if Arch boot entry exists:Installation finished. No errors reported.
Re-check boot entries:
Dual-boot
If you need to add a Windows boot entry, become root first:os-prober:
/etc/default/grub
Ctrl+X, then Y, then Enter).
Check for Windows Boot Manager:
Linux goodies
| Application | Description |
|---|---|
| Blue Screen of Life | Menu styled like the Windows Blue Screen of Death, but family-friendly |
| Arch Linux Gangster Edition Plymouth theme | Windows XP boot screen styled as gangster |
| macOS Boot Splash Style | Apple-style minimal boot splash |
| Plymouth Themes | A pack of multiple boot animations |